One of the more popular posts has been on creating a keypad. However, I hadn't really thought of it as a tutorial and just as an example of something I'd been messing with. It's time to address that.
The full project is available on Github: https://github.com/stepheng/UnityKeycodeExample

This is what we're going to end up with...
This differs from the previous version in that the UI runs in the world space. This is based on some pictures of touch screen based keypad door locks I've seen. So, the first step is to set up the scene.
Create an Empty Object at 0,0,0.
Add a Cube to the object and scale it to 1, 4/3, 0.1. Our keypad is going to have a 3:4 aspect ratio as our button layout will be 3x4.

Create a new, dark, material, and apply it to the cube. Just create a New Material and change the Albedo colour to something close to black. Give it a smoothness of 0.75. This isn't required but will make the lights we're going to use to show the status of the keypad more visible.

Add a Canvas to the empty object. Position it at 0, 0, -0.0501.
Set the Render Mode to World Space.
Since we're rendering the UI in world space we need to set an appropriate size and scale. The Width and Height values are used for rendering the UI whilst the Scale is used for rendering it in the world. We're maintaining a 3:4 ratio for the Canvas so the values need to be a suitably scaled up version. I picked 900 and 1200 for my Canvas. Set the X and Y scales to be 1/Width (in my case, 1/900). You'll see that the Canvas will be scaled to the size of the Cube.

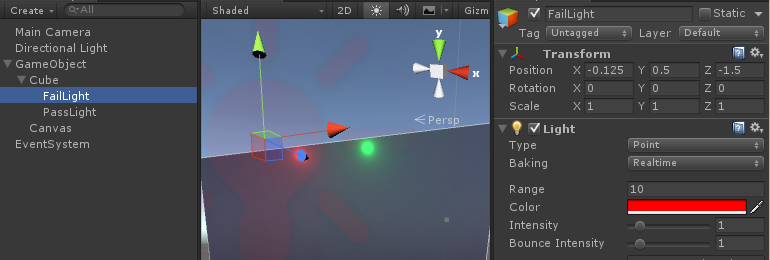
Add two new point lights to the Cube Set one to red, and one to green. These will be the indicators that the keypad is working. Set the light positions at -0.125, 0.5, -1.5, and 0.125, 0.5, -1.5.
Create a Button on the Canvas. We'll be resizing it in code later so the actual values we use here don't matter too much. Set an image for the button background. I made a 256x256 circle (filled white on transparent background) to get a higher quality image. If you don't want to use that, the Knob image that is included in Unity will work for test purposes.
Set the colour to #92B2FFFF and change the normal colour to #FFFFFF00, the highlighted colour to #F5F5F540, and the pressed colour to #FFFFFFFF. This will tint the image we're using as the background of the button to a light blue. We're making it transparent when the button isn't active, partially visible when the mouse hovers over it, and fully opaque when pressed. I also increased the Fade Duration to 0.25. Play around and find something you like.

Expand the Button in the object Hierarchy window so you can see the Text object. Set the colour to the same value you used as the image background (e.g. #92B2FFFF). You can change this if you want a different effect.
Drag the Button object into the Assets window to create it as a prefab. Delete the Button object from the Hierarchy.
Time to do some scripting. I'm assuming C# for these purposes.
Create a new script called Keypad and another called KeypadHandler.
Add Keypad to the Canvas, and KeypadHandler to the Cube.
In Keypad, declare an Interface for the keyboard.
internal interface IKeypadInterface {
    void KeypadSuccess(Keypad keypad);
    void KeypadFailure(Keypad keypad);
    void KeypadUpdated(Keypad keypad);
}

public class Keypad : MonoBehaviour {

}
We'll use this for communicating events that occur on the Keypad.
The next step is to build the keypad.
[RequireComponent(typeof(Canvas))]
public class Keypad : MonoBehaviour {
    Canvas parent;

    [SerializeField]
    Button buttonPrefab = null;

    [SerializeField]
    int columnCount = 3;

    [SerializeField]
    string[] buttonValues = { "X", "0", "OK", "1", "2", "3", "4", "5", "6", "7", "8", "9" };

    [SerializeField]
    int submitIndex = 2;

    [SerializeField]
    int cancelIndex = 0;

    [SerializeField]
    string keycode = "1234";

    [SerializeField]
    GameObject keypadHandler;
    IKeypadInterface keypadInterface;

    string internalKeypadValue = "";
    public string KeypadValue {
        get { return internalKeypadValue; }
    }

    // Use this for initialization
    void Start() {
        parent = GetComponent<Canvas>();
        keypadInterface = keypadHandler.GetComponent<IKeypadInterface>();

        BuildKeypad();
    }
}
There's a bunch of stuff here, but to break it down.
We're declaring some variables and using [SerializeField] to tell Unity to make them available in the inspector. This allows us to configure our keypad. buttonPrefab will be the prefab we created earlier. buttonValues is an array we use to label the buttons. submitIndex and cancelIndex are the index of the buttons which submit the code, or cancel it. the Canvas parent is a reference to the Canvas object our Button is in. We get that in the Start method. keypadHandler is the GameObject we added the KeypadHandler the script to, and keypadInterface is used to get the reference to the script class itself since Unity won't recognise the interface we declared in the inspector.
Add a new method, BuildKeypad, to generate the buttons.
    private void BuildKeypad() {
        // Get canvas size and correct for scaling
        RectTransform rectTransform = parent.GetComponent<RectTransform>();
        float parentWidth = rectTransform.rect.width * parent.scaleFactor;
        float parentHeight = rectTransform.rect.height * parent.scaleFactor;

        // Calculate button size
        float buttonSize = parentWidth / columnCount;
        // Minimum x position
        float buttonXStart = -(parentWidth - buttonSize) / 2;
        // Minimum y position
        float buttonYStart = -(parentHeight - buttonSize) / 2;
        Vector3 buttonPos = new Vector3(buttonXStart, buttonYStart, 0);
        for (int i = 0; i < buttonValues.Length; i++) {
            // Create new button from prefab
            Button button = Instantiate<Button>(buttonPrefab);
            // Add button to the Canvas
            button.transform.SetParent(transform, false);
            // Set button text
            button.GetComponentInChildren<Text>().text = buttonValues[i];
            // Set position of button
            button.GetComponentInChildren<RectTransform>().anchoredPosition = buttonPos;
            // Set size of button
            button.GetComponentInChildren<RectTransform>().sizeDelta = new Vector2(buttonSize, buttonSize);
            // Create a new primitive within the loop for the button, otherwise it will use the last value of i
            int buttonIndex = i;
            // Call ButtonPress with buttonIndex when a button is clicked
            button.onClick.AddListener(delegate { ButtonPress(buttonIndex); });
            // Increment x position
            buttonPos.x += buttonSize;
            // If we're at the far column, reset x and increment y
            if (i % columnCount == columnCount - 1) {
                buttonPos.x = buttonXStart;
                buttonPos.y += buttonSize;
            }
        }
    }
Not much to add that isn't in the comments. This assumes square buttons so you could have separate values for the width and height of the buttons.
Lastly, add methods to handle button presses and validation of the keypad value.
    void ButtonPress(int buttonIndex) {
        if (buttonIndex == cancelIndex) {
            internalKeypadValue = "";
            keypadInterface.KeypadUpdated(this);
            return;
        } else if (buttonIndex == submitIndex) {
            ValidateKeypadValue();
            return;
        }

        string buttonValue = buttonValues[buttonIndex];
        internalKeypadValue += buttonValue;
        if (keypadInterface != null) {
            keypadInterface.KeypadUpdated(this);
        }
    }

    void ValidateKeypadValue() {
        if (internalKeypadValue.Equals(keycode)) {
            keypadInterface.KeypadSuccess(this);
        } else {
            keypadInterface.KeypadFailure(this);
        }
        internalKeypadValue = "";
    }
ButtonPress(int) will be called when a button is clicked on. If buttonIndex matches cancelIndex, we reset the value and call KeypadUpdated(Keypad). ValidateKeypadValue() will be called when OK is clicked. This will fire KeypadSuccess(Keypad), or KeypadFailure(Keypad), and reset the value. If neither are matched, we get the string value of the button from our buttonValues array and append it to the internalKeypadValue string.
Validating the value is just a simple string comparison. We can set the value we use for comparison directly in the Unity inspector window so our keypad can be re-used in multiple locations with different codes without any code changes.
Open the KeypadHandler script. This one is much simpler.
public class KeypadHandler : MonoBehaviour, IKeypadInterface {

    [SerializeField]
    Light failLight = null, passLight = null;

    void Awake() {
        failLight.enabled = false;
        passLight.enabled = false;
    }

    public void KeypadSuccess(Keypad keypad) {
        passLight.enabled = true;
    }

    public void KeypadFailure(Keypad keypad) {
        failLight.enabled = true;
    }

    public void KeypadUpdated(Keypad keypad) {
        Debug.Log(keypad.KeypadValue);
        passLight.enabled = false;
        failLight.enabled = false;
    }
}
We set IKeypadInterface as an interface on this. Then declare the point lights we created earlier. In Awake, we turn the lights off by disabling them. Then we implement the methods declared in IKeypadInterface. On success, we enable passLight. On failure, we enable failLight. On a normal update (any keypress except 'OK') we turn the lights off.
Check everything builds. Fix any errors.
Now all we need is to hook everything up. Go back to Unity and select the Cube. If the scripts are compiling successfully you'll see Fail Light and Pass Light fields in the inspector under KeypadHandler script. Drag the appropriate point lights from the Hierarchy window to the fields (you can also click on the target icon to the right of the field and assign from that window).

Now, select the Canvas. Under the Keypad (Script) section you'll see our new fields. The only ones you need to set are Button Prefab (drag in the Button prefab we created earlier) and the Keypad Handler. Drag the Cube to the Keypad Handler field and we're done.

Try entering a pass code (1234 by default), or try entering the wrong one and trying to submit it. Check that the lights are hooked up. If everything's working you should be finished. To take it further, implement a new handler for unlocking a door. This could even be, plausibly, expanded to provide a basic UI for more complicated controls (e.g. remote controlling items in the world, basic menu/dialog selection).

The full project is available on Github: https://github.com/stepheng/UnityKeycodeExample