New rule:
"X": "F+[[X]-X]-F[-FX]+X"
angle_step set to 25.
axiom is -X.
We don't draw anything for X, it's just a control character we use for the rules.
Fractal Plant L-System
New rule:
"X": "F+[[X]-X]-F[-FX]+X"
angle_step set to 25.
axiom is -X.
We don't draw anything for X, it's just a control character we use for the rules.

Fractal Plant L-System
An extension to the L-System adding a stack so that we can push, and pop, the current state. This is typically denoted with a [ and ].
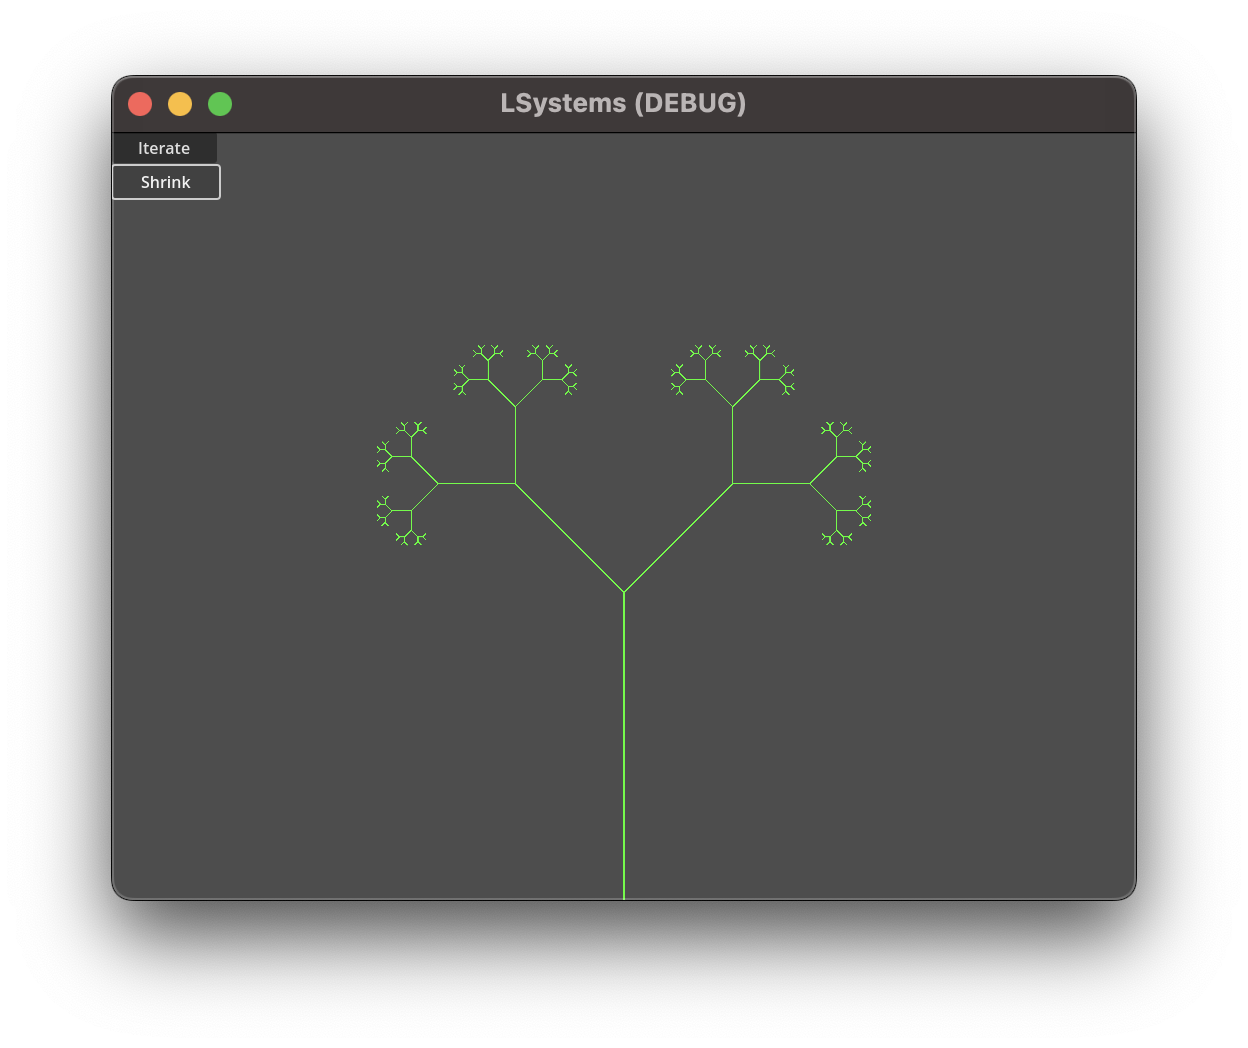
Binary Tree L-System
This is a simple as adding a stack array which we push a copy of the current position and angle into, and pop (copy the last of the stack over our current one and delete it) when we encounter those rules.
However, since we're starting to get a little complicated I decided to create a dictionary of commands so I can sub in alternatives when an L-System calls for slightly different behaviours for the same command.
var commands = {}

func _init():
    commands["F"] = func draw_forward_command(current: LNode, stack: Array):
        draw_forward(current, stack)
    commands["A"] = func draw_forward_command(current: LNode, stack: Array):
        draw_forward(current, stack)
    commands["B"] = func draw_forward_command(current: LNode, stack: Array):
        draw_forward(current, stack)
    commands["0"] = func draw_forward_command(current: LNode, stack: Array):
        draw_forward(current, stack)
    commands["1"] = func draw_forward_command(current: LNode, stack: Array):
        draw_forward(current, stack)
    commands["+"] = func rotate_left(current: LNode, stack: Array):
        current.angle -= angle_step
    commands["-"] = func rotate_right(current: LNode, stack: Array):
        current.angle += angle_step
    commands["["] = func push(current: LNode, stack: Array):
        stack.push_back(LNode.new(current.angle, current.position))
        current.angle += angle_step
    commands["]"] = func pop(current: LNode, stack: Array):
        var c = stack[-1]
        current.angle = c.angle
        current.position = c.position
        stack.remove_at(stack.size() - 1)
        current.angle -= angle_step
And the _draw() function is updated to:
func _draw():
    var start_x = (get_window().size.x / 2) * (1 / scale.x)
    var start_y = (get_window().size.y) * (1 / scale.y)
    var position = Vector2(start_x, start_y)
    var angle = 0
    var current = LNode.new(angle, position)
    var stack = []

    for command in axiom:
        commands.get(command, ignore).call(current, stack)
The axiom is set to 0 and the rules are:
0 → 1[+0]-0
1 → 11
The angle change is set to 45 degrees.
Nothing really changed from the original version... two new rules:
A → B-A-B
B → A+B+A
And our starting axiom is A.
Both A and B mean to draw forward at the current angle, - means to turn left 60 degrees, and + means turn right 60 degrees.
Iterations 1: B-A-B
Iteration 2: A+B+A-B-A-B-A+B+A
...

Sierpinkski triangle L-System
Tweaked the code a little to scale the canvas rather than changing the step length. To ensure it looks good I increase the line width by the inverse of the scale. Due to the way the rules are applied, the triangle is rendered inverted every other iteration. To compensate I use the iteration counter to flip the starting angle to keep it visible.
Playing with Godot 4 and re-visiting L-Systems as a familiarisation exercise.

Koch snowflake on the 3rd iteration
As before, we use a string to track the current state of the iterations and our rules in a dictionary. For each iteration, we loop over the characters in the axiom and, for each character, execute the rule (append the matching value, or the current character, to a new axiom string).
Not shown is the LNode class for holding the angle and the current position. I could track them in the same class I’m using for everything else. However, I know from previous work, I will want to store the state if I continue.
class_name LNode

var angle: float
var position: Vector2

func _init(a: float, p: Vector2):
    angle = a
position = pMove around with the arrow keys. An experiment with surfaces. The world is broken up into tiles which are rendered to surfaces so that we only have to re-draw the tiles when something changes. No real gameplay but surfaces are a powerful tool so well worth starting to learn them.
Click anywhere to place a bomb (or, destroy a wall). Use arrow keys to guide the bomb around the level. Bombs explode and destroy walls.
Sprites and animation, keyboard interactions, timings.
Ran out of time before having an actual win/lose state so this is more of a prototype of a single mechanic than a game.
if let oldUrl = oldUrl {
        let description = NSPersistentStoreDescription(url: oldUrl)
        persistentContainer.persistentStoreDescriptions = [description]
    }
    persistentContainer.loadPersistentStores { (description, error) in
        if let oldUrl = self.oldUrl {
        do {
            let psc = persistentContainer.persistentStoreCoordinator
            let store = psc.persistentStores[0]
            try psc.migratePersistentStore(store, to: url, options: nil, withType: NSSQLiteStoreType)                                                   self.deleteDatabase(url: oldUrl)
            self.cleanDb()
        } catch {
            block(description, error)
            return
        }
    }
Small update - instead of replacing, I use migratePersistentStore instead. This seems to work a little better with the current setup. So I have an oldUrl which is returned if the old store exists. If it's not nil I create the database against this and then migrate it to the correct location under Application Support. The old database still needs to be deleted in a separate step (assuming you no longer need it).
iOS 10 brought some welcome changes to Core Data and I need to migrate an existing database into this. Here’s how I did it.
First off, my existing DB is in the Documents folder. That’s not really good practice and NSPersistentContainer will create one in Application Support. That seems more sensible so I decided to move my Database. The default SQLite backed Core Data store includes SHM and WAL files (Write-Ahead Logging). To ensure you don’t lose data you need to move all three files at the same time. Fortunately, NSPersistentStoreCoordinator has built-in support for moving a database around.
First, I set up the NSPersistentStoreContainer:
persistentContainer = NSPersistentContainer(name: "GameModel")
persistentContainer.loadPersistentStores { (description, error) in
    if let error = error {
        fatalError("Could not create CoreData store: \(error)")
    }
    print(description)
}
This gives me something to work against. NSPersistentStoreContainer will create a NSPersistentStoreCoordinator with an sqlite DB at ApplicationSupport/GameModel.sqlite upon calling loadPersistentStores(completionHandler:). I want to replace that with the old Documents/Core_Data.sqlite. Fortunately, there’s a replace function right there.
let psc = persistentContainer.persistentStoreCoordinator
guard let storeUrl = psc.persistentStores.first?.url else {
    return
}
do {
    try psc.replacePersistentStore(at: storeUrl,
                                   destinationOptions: nil,
                                   withPersistentStoreFrom: oldUrl,
                                   sourceOptions: nil,
                                   ofType: NSSQLiteStoreType)
    persistentContainer.loadPersistentStores(completionHandler: { (description, error) in
        if let error = error {
            fatalError("Could not create CoreData store: \(error)")
        }
        print(description)
    })
} catch {
    print("Could not replace store: \(error)")
}
The newly created GameModel sqlite DB is replaced with the contents of the existing database by the replace call. I then need to call loadPersistentStores again to set up the NSPersistentContainer against the updated DB. Once it’s successful, I can delete the old DB files. There might be a better way, but this worked for me:
private func deleteOld(url: URL) {
        let parent = url.deletingLastPathComponent()
        let name = url.lastPathComponent
        do {
            try FileManager.default.contentsOfDirectory(at: parent, includingPropertiesForKeys: nil, options: [])
                .filter {
                    $0.lastPathComponent.hasPrefix(name)
                }
                .forEach {
                    try FileManager.default.removeItem(at: $0)
                }
        } catch {
            print("Failed to clear old DB: \(error)")
        }
    }
Where the passed URL is the old store URL.
A quick one because I was having trouble with this:
let node = SKShapeNode(rectOf: CGSize(width: 100, height: 100), cornerRadius: 5)
        let dashedShader = SKShader(source: "void main() {" +
            "float diff = u_path_length / 5.0;" +
            "float stripe = u_path_length / diff;" +
            "float distance = v_path_distance;" +
            "int h = int(mod(distance / stripe, 2.0));" +
            "gl_FragColor = vec4(h, h, h, h);" +
            "}")

        node.strokeShader = dashedShader

        node.fillColor = SKColor.clear
        node.lineWidth = 2
I've not done much with shaders before so when it didn't work I was short on tools to debug it. In the end it was a bunch of little things I had to solve, from converting the original version to one that would work against the iOS GL ES version, to making sure I converted to int before setting the colour.


I’ve finally buckled down and brought the old levels over so I’ve got a nice set of test data to validate against. In the end all it took was a couple of regex statements and a little copy/pasting.

Updated the Level Select screen to handle touch interactions. It’s now possible to tap on a puzzle image and be taken to that puzzle. I ended up using the userData: NSMutableDictionary property on the SKNode to both determine if the node the user tapped represents a puzzle, but also, which puzzle they tapped.
private func nodes(touches: Set<UITouch>) -> [SKNode]? {
    for touch in touches {
        let location = touch.location(in: currentScene)
        nodesTouched = currentScene.nodes(at: location)
        return nodesTouched.filter {
            guard let _ = $0.userData?[“puzzleName”] else { return false }
            return true
        }
    }
    return nil
}
Another small update. I’ve got three puzzles converted over from the previous game. I’m changing the format (and fixing some issues at the same time with how colours were handled). As a result, it’s a little time-consuming to get them all ported over. I’ll probably write a quick tool to convert the remainder.
Since I’m using the same background in a bunch of places I want to make it really easy to re-use. I could make a sub-class of UIViewController which implements the functionality. I’m not a fan of that, if it can be avoided. These things have tendency to grow. I could also create a static class method to return the background SKNode. That’s a little better but that’s just a form of composition and Swift actually gives us a nice way to implement this with Protcols and Extensions.
I start by moving declaring the function used for creating the background in a protocol. I’ll call it BackgroundProtocol because I’m awful at names. That’s easy to change later if I decide to add more functionality anyway.
protocol BackgroundProtocol {
    func createBackground(size: CGSize) -> SKNode
}
I can add that protocol to other classes and they’ll have the createBackground(size:) function available to them. Using an extension I can then create a default implementation (by striking coincidence, that’s the code I already had for this).
extension BackgroundProtocol {
    func createBackground(size: CGSize) -> SKNode {
        let node = SKEffectNode()
        // snip ...
        return node
    }
}
Now I can add that to all the views in my app and they can just call it to get the functionality. And, of course, it can be overridden if needed.
class MainMenuViewController: UIViewController, BackgroundProtocol {
    override func viewDidLoad() {
        super.viewDidLoad()
        let spriteView = (view as? SKView)!
        let scene = SKScene(size: view.bounds.size)
        scene.addChild(createBackground(size: scene.size))
        spriteView.presentScene(scene)
    }
}Just a quick one. Added a black fill colour with low opacity to the board to give it a little bit of depth and separation from the background.

So, I was getting bored of looking at a grey background and, as a break from cleaning up, refactoring, and adding the fiddly (nut necessary) UI code, I decided to run up a quick background.
The original version of Nonoku had a vertical gradient fill, light to dark, with subtle diagonal striping. I liked this so decided to reproduce it. However, it made sense to me to implement this in code. Since I’m using SpriteKit already, rendering to an SKEffectNode which rasterises the nodes made sense (the background is not animated so I can basically update once and be done).
There’s no native way, as far as I’m aware, to draw a gradient on a node, so the first thing would be to create an SKTexture. Again, since this is a one time deal, I’m not too worried. I’ve done something similar before so I already knew I could use a CIFilter to generate this. From that, I can get a CIImage. That can be passed to a CIContext to create a CGImage which can finally be passed to the SKTexture which I’ll pass into an SKSprite.
From reviewing the CIFilter documentation, I can get a list of available filters as follows:
class func filterNames(inCategory category: String?) -> [String]Even better, under the list of category constants, there is kCICategoryGradient. For this kind of quick exploratory code, I usually start a Swift Playground to spike out the things I don’t know.
So, skipping a step, I have this:
print("\(CIFilter.filterNames(inCategory: kCICategoryGradient))")
let filter = CIFilter(name: "CILinearGradient")
print("\(filter?.attributes)")
The list of filterNames has a couple of likely contenders, CILinearGradient and CISmoothLinearGradient. They take the same attributes (two colours, and two vectors) so I ended up trying both. In my use case I couldn’t see any difference between the two so decided to stick with CILinearGradient. If it ever comes up as an issue, it’s a very simple change to make.
CIFilter.attributes() gives me a list of the supported attributes, and a brief description of them. That's enough to define how I'm going to use it so I can leave the playground and come back to my code.
Since I want to create a new SKTexture with this gradient it makes sense to do it as an extension on SKTexture. I need the size, the start colour, and the end colour. I could add additional logic here but, following YAGNI (You Ain’t Gonna Need It), I am only interested in a vertical gradient so that’s all I’ll support.
extension SKTexture {
    convenience init?(size: CGSize, color1: SKColor, color2: SKColor) {
        guard let filter = CIFilter(name: "CILinearGradient") else {
            return nil
        }
        let startVector = CIVector(x: 0, y: size.height)
        let endVector = CIVector(x: 0, y: 0)
        filter.setValue(startVector, forKey: "inputPoint0")
        filter.setValue(endVector, forKey: "inputPoint1")
        filter.setValue(CIColor(color: color1), forKey: "inputColor0")
        filter.setValue(CIColor(color: color2), forKey: "inputColor1")

        let context = CIContext(options: nil)
        let rect = CGRect(x: 0, y: 0, width: size.width, height: size.height)
        guard let filterImage = filter.outputImage,
            let image = context.createCGImage(filterImage, from: rect) else {
            return nil
        }

        self.init(cgImage: image)
    }
}
Interestingly, whilst I can just get a ciColor from a UIColor (SKColor aliases UIColor), I can’t use it in the CIFilter due to the following issue.
*** -CIColor not defined for the UIColor UIExtendedSRGBColorSpace 0.666667 0.223529 0.223529 1; need to first convert colorspace.Instead, I had to create a new instance of CIColor with the UIColor. I’m not sure if there are any issues associated with this, but it’s working fine for me so far.
From there, I just created an SKSpriteNode with the generated texture. The lines were just stroked SKShapeNodes with a CGPath which just have a defined start and end point.
So here’s how it looks:

It’s still early so I’m not sure if this is the final version but it does make the game easier to play as it’s much easier to tell where the empty spaces are. Also, with this approach I can easily generate backgrounds with different colours so I have a bunch of options.
Mocking is a useful tool when writing unit tests. Due to limitations in the current swift version, there aren’t any real mocking frameworks like the ones you see for Java and Obj-C. That said, there are work arounds. Here’s a quick one when you need a one-off:
Method to test:
func crossDissolve(toIdentifier identifier: StoryboardIdentifier) {
    let nextViewController = viewController(forIdentifier: identifier)
    nextViewController.modalPresentationStyle = .fullScreen
    nextViewController.modalTransitionStyle = .crossDissolve
    show(nextViewController, sender: self)
}
This just performs a simple cross-dissolve between two view controllers (the one it’s on to the new one).There are four things to validate:
UIViewController passed to show(_:sender:) is the one expect.sender is correctfullScreencrossDissolveSince it doesn’t return any values I’m going to have to capture them instead. The method under test is crossDissolve(…) so I don’t want to change that behaviour. Everything else is fair game though. In this case, if I intercept the call to show(…) I can capture the parameters passed and validate them.
Since this is a one-off I can nest a class inside my test and capture the values appropriately. Then I can fill in the test.
func testCrossDissolve() {
    class MockSut: UIViewController {
        var showViewController: UIViewController?
        var showSender: Any?
        override func show(_ vc: UIViewController, sender: Any?) {
            showViewController = vc
            showSender = sender
        }
    }
    let mockSut = MockSut()
    mockSut.crossDissolve(toIdentifier: .gameViewController)
    XCTAssertNotNil(mockSut.showViewController as? GameViewController)
    XCTAssertEqual(mockSut.showSender as? UIViewController, mockSut)
    XCTAssertEqual(mockSut.showViewController?.modalPresentationStyle, .fullScreen)
    XCTAssertEqual(mockSut.showViewController?.modalTransitionStyle, .crossDissolve)
}
So, we’re creating a subclass of UIViewController and overriding a method that is called by the method we are interested in testing. Then we can use assertions to complete our test.
Of course, this could get messy if we had a bunch of test cases which needed to handle overrides. In that case I’d move the MockSut class out of the function and into the parent class. If I needed it outside of this specific set of tests, I’d move it into its own class so it could be used in multiple places.
So, looking back over the last code, I realised that I was overthinking it massively. The original reasoning behind it didn’t hold up, so I fixed it.
protocol NavigationProtocol {
    func viewController(forIdentifier identifier: StoryboardIdentifier) -> UIViewController
}

extension NavigationProtocol {
    private var storyboard: UIStoryboard {
        return UIStoryboard(name: "Main", bundle: nil)
    }

    func viewController(forIdentifier identifier: StoryboardIdentifier) -> UIViewController {
        return storyboard.instantiate(withIdentifier: identifier)
    }
}
Yep, that’s a bit smaller. Hooray.
Bonus - time for unit tests ;)
func testInstantiateViewController_Splash() {
        let viewController = sut.viewController(forIdentifier: .splashViewController)
        XCTAssertTrue(viewController is SplashViewController)
    }

    func testInstantiateViewController_MainMenu() {
        let viewController = sut.viewController(forIdentifier: .mainMenuViewController)
        XCTAssertTrue(viewController is MainMenuViewController)
}After installing SwiftLint I was going through resolving the issues. Fortunately, I hadn’t too many problems, mostly because it’s still a small project.
Some longish lines did catch my attention though.
enum StoryboardIdentifier: String {
    case splashViewController
    case mainMenuViewController
    case levelSelectViewController
    case optionsViewController
    case gameViewController
}

fileprivate extension UIStoryboard {
    func instantiateAppViewController(withIdentifier identifier: StoryboardIdentifier) -> UIViewController {
        return instantiateViewController(withIdentifier: identifier.rawValue)
    }
}

fileprivate class NavigationAssistant {
    private static let mainStoryboard = UIStoryboard(name: "Main", bundle: nil)

    private static var splashViewController: SplashViewController {
        return (mainStoryboard.instantiateAppViewController(withIdentifier: .splashViewController) as? SplashViewController)!
    }

    private static var mainMenuViewController: MainMenuViewController {
        return (mainStoryboard.instantiateAppViewController(withIdentifier: .mainMenuViewController) as? MainMenuViewController)!
    }

    private static var levelSelectViewController: LevelSelectViewController {
        return (mainStoryboard.instantiateAppViewController(withIdentifier: .levelSelectViewController) as? LevelSelectViewController)!
    }

    private static var optionsViewController: OptionsViewController {
        return (mainStoryboard.instantiateAppViewController(withIdentifier: .optionsViewController) as? OptionsViewController)!
    }

    private static var gameViewController: GameViewController {
        return (mainStoryboard.instantiateAppViewController(withIdentifier: .gameViewController) as? GameViewController)!
    }
As often seems to happen, on revisiting I can see a way to improve it. First off, it's a little bit verbose in the naming. Changing instantiateAppViewController to just instantiate shortens everything up to get it well under the limit. AppViewController is superfluous, named only to stop a naming collision between the extension and the actual class, and ViewController for the thing it is returning. instantiate could possibly be improved upon but it's clear enough in context for the moment.
That’s minor stuff though. What really caught my eye is that I’m repeating the same code over and over. That cast is kind of messy since I’m kind of cheating SwiftLint there. Without that I had return mainStoryboard.instantiateAppViewController(withIdentifier: .splashViewController) as! SplashViewController which is marginally shorter but it’s not really the problem. What I don’t like is that it’s the same call each time with the only change being the Type I’m casting to. If, instead of casting back as a UIViewController, I was to cast back as the type I was expecting then that would save a bunch of repeated code.
I’ve used generics a bunch of times but I keep forgetting about them - at least when I’m first writing out the code. That’s not necessarily a bad thing since the current way works and I’ve come back to it eventually to clean things up. That’s partly my reasoning for writing this post though, to remember to use these things (appropriately).
So, modify the call which returns the UIViewController to return a generic. Easy:
fileprivate extension UIStoryboard {
    func instantiate<T>(withIdentifier identifier: StoryboardIdentifier) -> T {
        return (instantiateViewController(withIdentifier: identifier.rawValue) as? T)!
    }
}
Fairly straight forward, still have that ugly ‘cast to optional, force unwrap’ to appease SwiftLint. Wait a second, SwiftLint also has a rule about force unwrapping! Optional, but maybe there’s a better way.
guard let viewController = instantiateViewController(withIdentifier: identifier.rawValue) as? T else {
    fatalError("Could not instantiate viewController")
 }
return viewController
There we go. Now it’s explicit what the behaviour is meant to be. It’s a little more code but no-one scanning the code should be confused by the intent.
So the whole thing looks like this now. Much better. The repeated logic is now in a single place. I'm happier with how it looks and, whilst there might be more lines, it feels more compact. I think there are some other improvements that can be made but that goes outside the scope of this post.
enum StoryboardIdentifier: String {
    case splashViewController
    case mainMenuViewController
    case levelSelectViewController
    case optionsViewController
    case gameViewController
}

fileprivate extension UIStoryboard {
    func instantiate<T>(withIdentifier identifier: StoryboardIdentifier) -> T {
        guard let viewController = instantiateViewController(withIdentifier: identifier.rawValue) as? T else {
            fatalError("Could not instantiate viewController")
        }
        return viewController
    }
}

fileprivate class NavigationAssistant {
    private static let mainStoryboard = UIStoryboard(name: "Main", bundle: nil)

    private static var splashViewController: SplashViewController {
        return mainStoryboard.instantiate(withIdentifier: .splashViewController)
    }

    private static var mainMenuViewController: MainMenuViewController {
        return mainStoryboard.instantiate(withIdentifier: .mainMenuViewController)
    }

    private static var levelSelectViewController: LevelSelectViewController {
        return mainStoryboard.instantiate(withIdentifier: .levelSelectViewController)
    }

    private static var optionsViewController: OptionsViewController {
        return mainStoryboard.instantiate(withIdentifier: .optionsViewController)
    }

    private static var gameViewController: GameViewController {
        return mainStoryboard.instantiatZ(withIdentifier: .gameViewController)
    }
Combining an SKNode with a UIScrollView. These are two things which don’t go together natively. However, I wanted a scrolling view. I didn’t want to re-implement the UIScrollView in SpriteKit. I also didn’t want to have to handle rendering the puzzle to a UIImage and create UIImageViews when I already had a perfectly good method for building an SKNode from the tiles. A little modifying to let me add it to an SKEffectNode and I had my image. Create a new SKScene and present it in my view and I have part of the solution.
Adding it to the UIScrollView isn’t possible, but getting the offset of the scrollview is so if I tell it the content is larger than the screen. Say, large enough to fit the grid of puzzle images, I could attach those images to a SKNode and move it by the offset.
extension ViewController: UIScrollViewDelegate {
    func scrollViewDidScroll(_ scrollView: UIScrollView) {
        gridNode.position.x = -scrollView.contentOffset.x
          gridNode.postion.y = scrollView.contentOffset.x
    }
}
I only care about horizontal movement. The gridNode is positioned at 0,0 in the scene. Horizontal movement is inverted, relative to the offset. Vertical movement is not because the SpriteKit coordinate system is inverted vertically compared to the UIView coordinates. In SpriteKit, 0,0 is in the bottom-left of the screen and increasing the y-coord moves it towards the top, UIView would put it in the top-left and increasing the y-coord moves it towards the bottom.
Since the scene is sitting behind the components I still get the UIScrollView scroll bars, and any other controls I might add and now I don’t have to re-implement the UIScrollView.
Next up, passing a touch event through to the scene.

Added the game mechanic where the number of hidden tiles matching the selected tile colour is revealed. This will need prettifying later but, for now, the next step is to add more puzzles to the game so that it’s playable.

It's now possible to select areas and fill them in based on the colour selected. Incorrectly coloured tiles will not be revealed. This feels like a very big step and, ultimately, it all fell into place in just a few lines of code.
Looking back, I've clearly grown as a developer since I wrote the first version. Whilst I've made decisions that simplify the interface, I've also implemented a lot of the functionality that caused me a lot of pain before in just a few lines now. Part of that is making better technical decisions up front, another part is using the right tools. Another big piece is just having more experience in more areas so I have more ideas of what is going to be available to me before I start coding.
Overall, I'm happy with the progress so far and I'm glad I'm making the time to go back update an old project.