New rule:
"X": "F+[[X]-X]-F[-FX]+X"
angle_step set to 25.
axiom is -X.
We don't draw anything for X, it's just a control character we use for the rules.

Fractal Plant L-System
New rule:
"X": "F+[[X]-X]-F[-FX]+X"
angle_step set to 25.
axiom is -X.
We don't draw anything for X, it's just a control character we use for the rules.
Fractal Plant L-System
An extension to the L-System adding a stack so that we can push, and pop, the current state. This is typically denoted with a [ and ].
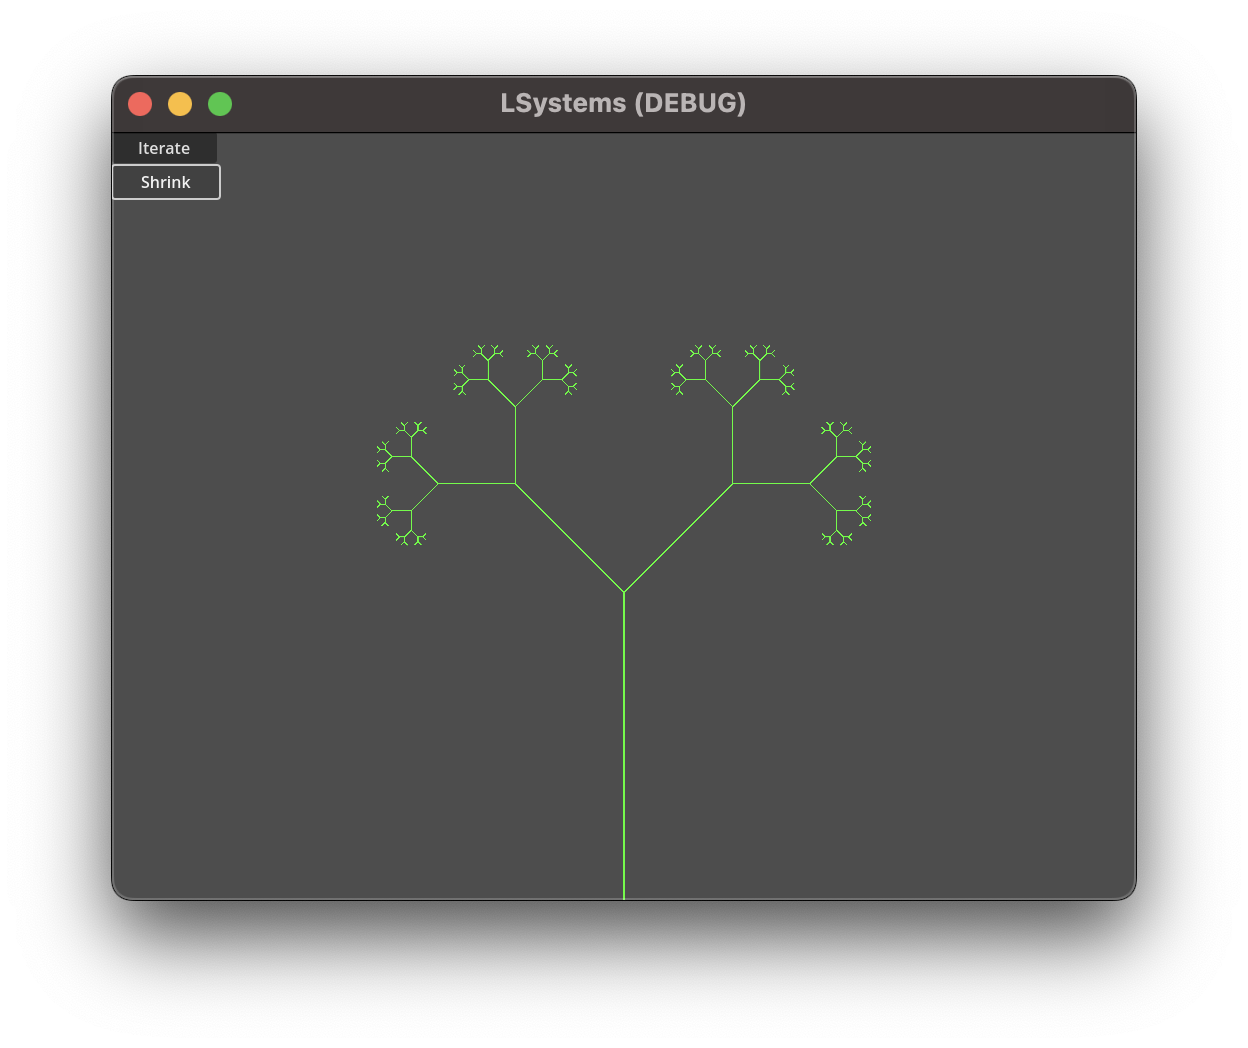
Binary Tree L-System
This is a simple as adding a stack array which we push a copy of the current position and angle into, and pop (copy the last of the stack over our current one and delete it) when we encounter those rules.
However, since we're starting to get a little complicated I decided to create a dictionary of commands so I can sub in alternatives when an L-System calls for slightly different behaviours for the same command.
var commands = {}

func _init():
    commands["F"] = func draw_forward_command(current: LNode, stack: Array):
        draw_forward(current, stack)
    commands["A"] = func draw_forward_command(current: LNode, stack: Array):
        draw_forward(current, stack)
    commands["B"] = func draw_forward_command(current: LNode, stack: Array):
        draw_forward(current, stack)
    commands["0"] = func draw_forward_command(current: LNode, stack: Array):
        draw_forward(current, stack)
    commands["1"] = func draw_forward_command(current: LNode, stack: Array):
        draw_forward(current, stack)
    commands["+"] = func rotate_left(current: LNode, stack: Array):
        current.angle -= angle_step
    commands["-"] = func rotate_right(current: LNode, stack: Array):
        current.angle += angle_step
    commands["["] = func push(current: LNode, stack: Array):
        stack.push_back(LNode.new(current.angle, current.position))
        current.angle += angle_step
    commands["]"] = func pop(current: LNode, stack: Array):
        var c = stack[-1]
        current.angle = c.angle
        current.position = c.position
        stack.remove_at(stack.size() - 1)
        current.angle -= angle_step
And the _draw() function is updated to:
func _draw():
    var start_x = (get_window().size.x / 2) * (1 / scale.x)
    var start_y = (get_window().size.y) * (1 / scale.y)
    var position = Vector2(start_x, start_y)
    var angle = 0
    var current = LNode.new(angle, position)
    var stack = []

    for command in axiom:
        commands.get(command, ignore).call(current, stack)
The axiom is set to 0 and the rules are:
0 → 1[+0]-0
1 → 11
The angle change is set to 45 degrees.
Nothing really changed from the original version... two new rules:
A → B-A-B
B → A+B+A
And our starting axiom is A.
Both A and B mean to draw forward at the current angle, - means to turn left 60 degrees, and + means turn right 60 degrees.
Iterations 1: B-A-B
Iteration 2: A+B+A-B-A-B-A+B+A
...
Sierpinkski triangle L-System
Tweaked the code a little to scale the canvas rather than changing the step length. To ensure it looks good I increase the line width by the inverse of the scale. Due to the way the rules are applied, the triangle is rendered inverted every other iteration. To compensate I use the iteration counter to flip the starting angle to keep it visible.
| extends Node2D | |
| #var axiom = "F++F++F++" | |
| var axiom = "A" | |
| var angle_step = deg_to_rad(60) | |
| var iteration = 1 | |
| var step_length: float = 64 | |
| var frame = Rect2(0, 0, 0, 0) | |
| var rules = { | |
| "F": "F-F++F-F", | |
| "A": "B-A-B", | |
| "B": "A+B+A" | |
| } | |
| # Called when the node enters the scene tree for the first time. | |
| func _ready(): | |
| pass # Replace with function body. | |
| # Called every frame. 'delta' is the elapsed time since the previous frame. | |
| func _process(delta): | |
| pass | |
| func _draw(): | |
| var start_x = 0 if iteration % 2 == 1 else (get_window().size.x * (1 / scale.y)) | |
| var start_y = (get_window().size.y) * (1 / scale.y) | |
| var position = Vector2(start_x, start_y) | |
| var angle = deg_to_rad(90) if iteration % 2 == 1 else deg_to_rad(270) | |
| var current = LNode.new(angle, position) | |
| for command in axiom: | |
| match(command): | |
| "F", "A", "B": | |
| var delta = Vector2.UP.rotated(current.angle) * step_length | |
| var end_point = current.position + delta | |
| draw_line(current.position, end_point, Color.GREEN, 1.0 / scale.x, true) | |
| current.position = end_point | |
| "+": | |
| current.angle -= angle_step | |
| "-": | |
| current.angle += angle_step | |
| frame.size.x = max(current.position.x - start_x, frame.size.x) | |
| frame.size.y = max(current.position.y - start_y, frame.size.y) | |
| frame.position.x = min(current.position.x - start_x, frame.position.x) | |
| frame.position.x = min(current.position.y - start_y, frame.position.y) | |
| func _on_button_pressed(): | |
| iteration += 1 | |
| var new_axiom = "" | |
| for command in axiom: | |
| var rule = rules.get(command, command) | |
| new_axiom += rule | |
| axiom = new_axiom | |
| queue_redraw() | |
| func _on_shrink_pressed(): | |
| scale *= 0.75 | |
| queue_redraw() |
Playing with Godot 4 and re-visiting L-Systems as a familiarisation exercise.
Koch snowflake on the 3rd iteration
As before, we use a string to track the current state of the iterations and our rules in a dictionary. For each iteration, we loop over the characters in the axiom and, for each character, execute the rule (append the matching value, or the current character, to a new axiom string).
| extends Node2D | |
| var axiom = "F++F++F++" | |
| var angle_step = deg_to_rad(60) | |
| var iteration = 1 | |
| var step_length: float = 64 | |
| var rules = { | |
| "F": "F-F++F-F" | |
| } | |
| # Called when the node enters the scene tree for the first time. | |
| func _ready(): | |
| pass # Replace with function body. | |
| # Called every frame. 'delta' is the elapsed time since the previous frame. | |
| func _process(delta): | |
| pass | |
| func _draw(): | |
| var start_x = get_window().size.x / 2 | |
| var position = Vector2(start_x, get_window().size.y) | |
| var angle = angle_step | |
| var current = LNode.new(angle, position, step_length) | |
| var stack = [] | |
| for command in axiom: | |
| match(command): | |
| "F": | |
| var delta = Vector2.UP.rotated(current.angle) * current.step_length | |
| var end_point = current.position + delta | |
| draw_line(current.position, end_point, Color.GREEN, 1.0) | |
| current.position = end_point | |
| "+": | |
| current.angle -= angle_step | |
| "-": | |
| current.angle += angle_step | |
| func _on_button_pressed(): | |
| iteration += 1 | |
| var new_axiom = "" | |
| for command in axiom: | |
| var rule = rules.get(command, command) | |
| new_axiom += rule | |
| axiom = new_axiom | |
| queue_redraw() | |
| func _on_shrink_pressed(): | |
| step_length /= 2 | |
| step_length = max(0.1, step_length) | |
| queue_redraw() |
Not shown is the LNode class for holding the angle and the current position. I could track them in the same class I’m using for everything else. However, I know from previous work, I will want to store the state if I continue.
class_name LNode

var angle: float
var position: Vector2

func _init(a: float, p: Vector2):
    angle = a
position = pFor my own benefit ;) React app with typescript, aslant, and prettier, through yarn.
yarn create react-app my-app --template typescript
cd my-app
yarn add eslint @typescript-eslint/parser @typescript-eslint/eslint-plugin prettier eslint-config-prettier eslint-plugin-prettier --dev
Create a .eslint.rc file:
module.exports = {
  parser: "@typescript-eslint/parser",
  parserOptions: {
    ecmaVersion: 2020,
    sourceType: "module",
    ecmaFeatures: {
      jsx: true
    }
  },
  settings: {
    react: {
      version: "detect"
    }
  },
  extends: [
    "plugin:react/recommended",
    "plugin:@typescript-eslint/recommended",
    "plugin:prettier/recommended" // Should be last
  ],
  rules: {
    // Specify ESLint rules
  },
};
Create a .prettierrc.js file:
module.exports = {
  semi: true,
  trailingComma: "all",
  singleQuote: true,
  printWidth: 120,
  tabWidth: 4
};
If you get the error:
Error while loading rule 'prettier/prettier': context.getPhysicalFilename is not a functionRun the following command to update eslint:
yarn upgrade -R eslintChecking out Godot so remade one of my earliest games I ‘finished’ to a point I could show it to people. An important lesson in managing scope, time, and the value of a joke 😉. This was back when J2ME was still a thing so the original was running on a 128x128 screen. The original was put together in just an evening and this was done in the same spirit.
Move around with the arrow keys. An experiment with surfaces. The world is broken up into tiles which are rendered to surfaces so that we only have to re-draw the tiles when something changes. No real gameplay but surfaces are a powerful tool so well worth starting to learn them.
Click anywhere to place a bomb (or, destroy a wall). Use arrow keys to guide the bomb around the level. Bombs explode and destroy walls.
Sprites and animation, keyboard interactions, timings.
Ran out of time before having an actual win/lose state so this is more of a prototype of a single mechanic than a game.
if let oldUrl = oldUrl {
        let description = NSPersistentStoreDescription(url: oldUrl)
        persistentContainer.persistentStoreDescriptions = [description]
    }
    persistentContainer.loadPersistentStores { (description, error) in
        if let oldUrl = self.oldUrl {
        do {
            let psc = persistentContainer.persistentStoreCoordinator
            let store = psc.persistentStores[0]
            try psc.migratePersistentStore(store, to: url, options: nil, withType: NSSQLiteStoreType)                                                   self.deleteDatabase(url: oldUrl)
            self.cleanDb()
        } catch {
            block(description, error)
            return
        }
    }
Small update - instead of replacing, I use migratePersistentStore instead. This seems to work a little better with the current setup. So I have an oldUrl which is returned if the old store exists. If it's not nil I create the database against this and then migrate it to the correct location under Application Support. The old database still needs to be deleted in a separate step (assuming you no longer need it).
iOS 10 brought some welcome changes to Core Data and I need to migrate an existing database into this. Here’s how I did it.
First off, my existing DB is in the Documents folder. That’s not really good practice and NSPersistentContainer will create one in Application Support. That seems more sensible so I decided to move my Database. The default SQLite backed Core Data store includes SHM and WAL files (Write-Ahead Logging). To ensure you don’t lose data you need to move all three files at the same time. Fortunately, NSPersistentStoreCoordinator has built-in support for moving a database around.
First, I set up the NSPersistentStoreContainer:
persistentContainer = NSPersistentContainer(name: "GameModel")
persistentContainer.loadPersistentStores { (description, error) in
    if let error = error {
        fatalError("Could not create CoreData store: \(error)")
    }
    print(description)
}
This gives me something to work against. NSPersistentStoreContainer will create a NSPersistentStoreCoordinator with an sqlite DB at ApplicationSupport/GameModel.sqlite upon calling loadPersistentStores(completionHandler:). I want to replace that with the old Documents/Core_Data.sqlite. Fortunately, there’s a replace function right there.
let psc = persistentContainer.persistentStoreCoordinator
guard let storeUrl = psc.persistentStores.first?.url else {
    return
}
do {
    try psc.replacePersistentStore(at: storeUrl,
                                   destinationOptions: nil,
                                   withPersistentStoreFrom: oldUrl,
                                   sourceOptions: nil,
                                   ofType: NSSQLiteStoreType)
    persistentContainer.loadPersistentStores(completionHandler: { (description, error) in
        if let error = error {
            fatalError("Could not create CoreData store: \(error)")
        }
        print(description)
    })
} catch {
    print("Could not replace store: \(error)")
}
The newly created GameModel sqlite DB is replaced with the contents of the existing database by the replace call. I then need to call loadPersistentStores again to set up the NSPersistentContainer against the updated DB. Once it’s successful, I can delete the old DB files. There might be a better way, but this worked for me:
private func deleteOld(url: URL) {
        let parent = url.deletingLastPathComponent()
        let name = url.lastPathComponent
        do {
            try FileManager.default.contentsOfDirectory(at: parent, includingPropertiesForKeys: nil, options: [])
                .filter {
                    $0.lastPathComponent.hasPrefix(name)
                }
                .forEach {
                    try FileManager.default.removeItem(at: $0)
                }
        } catch {
            print("Failed to clear old DB: \(error)")
        }
    }
Where the passed URL is the old store URL.
A quick one because I was having trouble with this:
let node = SKShapeNode(rectOf: CGSize(width: 100, height: 100), cornerRadius: 5)
        let dashedShader = SKShader(source: "void main() {" +
            "float diff = u_path_length / 5.0;" +
            "float stripe = u_path_length / diff;" +
            "float distance = v_path_distance;" +
            "int h = int(mod(distance / stripe, 2.0));" +
            "gl_FragColor = vec4(h, h, h, h);" +
            "}")

        node.strokeShader = dashedShader

        node.fillColor = SKColor.clear
        node.lineWidth = 2
I've not done much with shaders before so when it didn't work I was short on tools to debug it. In the end it was a bunch of little things I had to solve, from converting the original version to one that would work against the iOS GL ES version, to making sure I converted to int before setting the colour.
As, principally, an iOS developer, Swift has made for interesting times. Whilst the first code I wrote in Swift was heavily influenced by Obj-C patterns I (like many before me) quickly discovered that this was not the best way. A core part of Reactive Programming is Functional Programming, so that seems like a good place to start.
Following some best practices, and advice from others (including Apple’s WWDC sessions) I found I was moving to writing code that adhered more closely to the Functional Programming patterns. That’s not to say it was intentional, or that I was accidentally discovering Functional Programming on my own. Just that adopting it more formally is a smaller step than I was expecting.
In summary (and this is simplified) functional programming emphasises immutability and minimises state. The output of a function is dependent only on its input. An inherent requirement is that functions do not have side effects. A common description states:
[C]omputation as the evaluation of mathematical functions
- Functional programming - Wikipedia
I’ll be honest, it took me longer than it really should have for that statement to click with me. In the hope that I’m not the only one, here’s an example showing a simple mathematical function using imperative and functional approaches. We’ll evaluate the mathematical function 3 + 2 + 6 + -1:
class ImperativeNumber {
    var value: Int

   func add(value: Int) {
        self.value += value
    }

    init(value: Int) {
        self.value = value
    }
}

let imperativeThree = ImperativeNumber(value: 3)
var imperativeNumber = imperativeThree
imperativeNumber.add(value: 2)
imperativeNumber.add(value: 6)
imperativeNumber.add(value: -1)
print(imperativeNumber.value)      // 10
print(imperativeThree.value)   // 10

struct FunctionalNumber {
    let value: Int

    func add(value: Int) -> FunctionalNumber {
        return FunctionalNumber(value: self.value + value)
    }
}

let functionalThree = FunctionalNumber(value: 3)
let functionalNumber = functionalThree
    .add(value: 2)
    .add(value: 6)
    .add(value: -1)
print(functionalNumber.value)      // 10
print(functionalThree.value)   // 3
In functional programming, like the mathematical function, the value of “3” does not change because we added “2” to it. Instead, we have a new number that we can perform a new function on. If “3” did change, as in the imperative case, then anything else that used “3” in its calculations would be affected as “3” could now be “5”, or “11”, or “10”. It’s quite common to see this chaining pattern in functional programming, and reactive programming.
A note on naming. According to Swift guidelines, a function without side-effects should be a noun, and a function that has side-effects should be a verb. It’s the difference between getting an object, or performing an action on it. See also, Array.sort and Array.sorted. However, whilst some Swift types have imperative and functional equivalents, the versions which have their roots in functional programming typically only have the functional equivalent (e.g. filter, map, flatMap) regardless of if they could be implemented in an imperative fashion. If we have a purely functional type, it should not be unexpected, to use the verb form. However, when mixing functional and imperative code, it’s likely best to adhere to the guidelines:
struct ScoreBoard {
    private(set) var counter = 0

    mutating func increment() {
        counter += 1
    }

    func incremented() -> ScoreBoard {
        return ScoreBoard(counter: counter + 1)
    }
}
What functional programming means for your code is that it is safer. If an object can’t be mutated, you aren’t at risk of an object being modified by another thread whilst you read from it. It’s also easier to test when you are guaranteed the same result based on a consistent input.
I started taking a look at functional programming recently, and more particularly in the context of Reactive Programming. There’s a lot to cover and remember and I’ve found writing it down helps. To that end, I’m going to try and write a few blog posts as I go in the hope of remembering this stuff and working through some ideas as I do. Hopefully, if I make any mistakes, someone can correct me. And maybe it will help someone else.
I’ve finally buckled down and brought the old levels over so I’ve got a nice set of test data to validate against. In the end all it took was a couple of regex statements and a little copy/pasting.
Updated the Level Select screen to handle touch interactions. It’s now possible to tap on a puzzle image and be taken to that puzzle. I ended up using the userData: NSMutableDictionary property on the SKNode to both determine if the node the user tapped represents a puzzle, but also, which puzzle they tapped.
private func nodes(touches: Set<UITouch>) -> [SKNode]? {
    for touch in touches {
        let location = touch.location(in: currentScene)
        nodesTouched = currentScene.nodes(at: location)
        return nodesTouched.filter {
            guard let _ = $0.userData?[“puzzleName”] else { return false }
            return true
        }
    }
    return nil
}Another small update. I’ve got three puzzles converted over from the previous game. I’m changing the format (and fixing some issues at the same time with how colours were handled). As a result, it’s a little time-consuming to get them all ported over. I’ll probably write a quick tool to convert the remainder.
Since I’m using the same background in a bunch of places I want to make it really easy to re-use. I could make a sub-class of UIViewController which implements the functionality. I’m not a fan of that, if it can be avoided. These things have tendency to grow. I could also create a static class method to return the background SKNode. That’s a little better but that’s just a form of composition and Swift actually gives us a nice way to implement this with Protcols and Extensions.
I start by moving declaring the function used for creating the background in a protocol. I’ll call it BackgroundProtocol because I’m awful at names. That’s easy to change later if I decide to add more functionality anyway.
protocol BackgroundProtocol {
    func createBackground(size: CGSize) -> SKNode
}
I can add that protocol to other classes and they’ll have the createBackground(size:) function available to them. Using an extension I can then create a default implementation (by striking coincidence, that’s the code I already had for this).
extension BackgroundProtocol {
    func createBackground(size: CGSize) -> SKNode {
        let node = SKEffectNode()
        // snip ...
        return node
    }
}
Now I can add that to all the views in my app and they can just call it to get the functionality. And, of course, it can be overridden if needed.
class MainMenuViewController: UIViewController, BackgroundProtocol {
    override func viewDidLoad() {
        super.viewDidLoad()
        let spriteView = (view as? SKView)!
        let scene = SKScene(size: view.bounds.size)
        scene.addChild(createBackground(size: scene.size))
        spriteView.presentScene(scene)
    }
}
In Obj-C, Swift 2, and RFC 7230, headers are case-insensitive. Changes in Swift 3 have put them into a normal Dictionary which caused some unexpected behaviour when I discovered that the server was sometimes returning headers as Camel-Case, or lower-case. My code had been working fine until I moved from Swift 2.2 to Swift 3, thanks to the documented behaviour of HTTPURLResponse.
There’s a bug logged already for this so, thankfully, it was quick to discover what the underlying issue was.
I had a quick look through proposed solutions but they all involved changing the code to handle this special case. I was loathe to make these alterations since none of them looked particularly clean and, if this got fixed, I wanted something that would be quick to remove. My case was X-Custom-Header occasionally being returned as x-custom-header.
Since I didn’t want to change the existing code if I didn’t have to (at least, not in a way that would take a bunch of work to revert down the road), I started looking at writing an extension for Dictionary and adding support for additional subscripts.
So, since I can’t guarantee the response, here's the full thing I ended up with to cover as many cases as possible:
struct DictionaryKey: Hashable {
        let keys: [String]
        var hashValue: Int {
            get {
                return keys[0].hashValue
            }
        }
    }
    func ==(lhs: DictionaryKey, rhs: DictionaryKey) -> Bool {
        return lhs.keys == rhs.keys
    }

    fileprivate extension Dictionary {
        subscript(key: String) -> Value? {
            get {
                let anyKey = key as! Key
                if let value = self[anyKey] {
                    return value
                }
                if let value = self[key.lowercased() as! Key] {
                    return value
                }
                if let value = self[key.capitalized as! Key] {
                    return value
                }
                for (storedKey, storedValue) in self {
                    if let stringKey = storedKey as? String {
                        if stringKey.caseInsensitiveCompare(key) == .orderedSame {
                            return storedValue
                        }
                    }
                }

                return nil
            }
            set {
                self[key] = newValue
            }
        }

        subscript(key: DictionaryKey) -> Value? {
            get {
                for string in key.keys {
                    if let value = self[string as! Key] {
                        return value
                    }
                }

                return nil
            }
        }
    }
Starting with the extension:
Strings, that’s the only case we’re intercepting.This covers all use cases but I was curious how it stacked up in terms of performance.
Using dispatch_benchmark to run 100,000 iterations 10 times (extern uint64_t dispatch_benchmark(size_t count, void (^block)(void));) I created a Dictionary of typical header keys and values and got some timings. All tests were run with optimisation set to -Os
let headerFields = ["User-Agent": "Some User Agent",
                    "Accept": "text/html,application/xhtml+xml,application/xml;q=0.9,*/*;q=0.8",
                    "Accept-Language": "en-us,en;q=0.5",
                    "Accept-Encoding": "gzip,deflate",
                    "Accept-Charset": "ISO-8859-1,utf-8;q=0.7,*;q=0.7",
                    "Keep-Alive": "300",
                    "Connection": "keep-alive",
                    "Cookie": "PHPSESSID=r2t5uvjq435r4q7ib3vtdjq120",
                    "Pragma": "no-cache",
                    "Cache-Control": "no-cache",
                    "X-Custom-Header" : "12345678",
                    "Etag": "87654321"]
let header = "X-Custom-Header"
let t = dispatch_benchmark(100000) {
    let _ = headerFields[header]
}
Against a standard dictionary, where we have a matching key (and this dictionary is case-sensitive): Avg. Runtime: 1257ns
Against a standard dictionary but having to make two checks because the first one was nil: Avg: Runtime: 2412ns
Against my dictionary extension, with a perfect match: Avg .Runtime: 1213ns (re-checked this a few times and it went up and down marginally so I would say it’s basically comparable to a standard dictionary check).
Against my extension with a lower-case name in the headers (the issue I was encountering): Avg:.Runtime: 2511ns - Suprisingly good. I certainly wouldn’t be inclined to duplicate the check with different case given that this is likely to be a one-off check rather than something that’s going to be performance gating
Against my extension with a capitalised name in the headers (x-custom-header -> X-Custom-Header issue): Avg: Runtime: 8928ns - Quite a jump but, in this use case, it’s probably fine
Against my extension with arbitrary case. Avg: Runtime: 22317ns - This is the worst case and it shows in the performance.
Since the capitalisation check turned out to be quite expensive, I wondered if there was an alternative way to handle it. This is due the note in the documentation that content-length would be changed to Content-Length. I didn’t actually see this in testing so it might not be needed, but now I was curious.
I created a Hashable struct which contains an array of Strings. This can be used to get a value from the dictionary thanks to another subscript which just iterates through the array returns on the first value. For two values (second one succeeds) I got:
Avg: Runtime: 2430ns - So pretty much what you’d expect. Very close to two dictionary fetches. I don’t need this (yet) but it’s a nice to have.
For my case, I made the extension fileprivate so it’s only available in the file it’s declared in. That worked fine for my particular issue, although that might change in the future. Should the issue be fixed in the future, I can delete the extension and all my current cases will still work fine. If I end up with any DictionaryKeys style stuff in there, I can delete the struct and a quick search/replace will get the rest back in line.
So, the moral of story is that stuff you depend on can break in interesting ways - especially between major versions.
UPDATE: Injection was dropped at some point unless you have a premium account. For a simpler solution, just use a Markdown block, put the code into a Github gist, and paste the embed code (e.g. <script src="https://gist.github.com/stepheng/f2d2f6aa9b4ecdfa5cc9b295f0b0026f.js"></script>) into that and it will work. Less convenient for brief snippets though.
I like to write my blog posts in Markdown. A limitation of Squarespace is that my code blocks are missing syntax highlighting and differentiation from the surrounding code. There are a few posts about this, and I originally looked at this one regarding Prism.js . Unfortunately, those formatting problems mentioned, and the fact that it wasn’t working with my Markdown flow, meant that I wasn’t satisfied with it as a solution. When it comes to blogging, I want as few roadblocks in the way as possible. The extra spacing it put in was just ugly as well.
Another blog post suggested using highlight.js . Following those instructions, I got it working almost immediately. I didn’t bother going further than that initial step as I haven’t (yet) encountered the issues the author mentions.
One thing I had to do was include Swift support as it’s not in the common set.
My injected code (in the footer, as suggested in Mike Raynham’s post ) is below:
<link rel="stylesheet" href="//cdnjs.cloudflare.com/ajax/libs/highlight.js/9.9.0/styles/atom-one-light.min.css">
<script src="//cdnjs.cloudflare.com/ajax/libs/highlight.js/9.9.0/highlight.min.js"></script>
<script src="//cdnjs.cloudflare.com/ajax/libs/highlight.js/9.4.0/languages/swift.min.js"></script>
<script>hljs.initHighlightingOnLoad();</script>
It's applied automatically too. And hey, it even works for the example in the post about how to enable syntax highlighting.
From this... to this
I’ve had this happen on two separate machines now. A quick search put me in the right direction .
For me, quitting Xcode, renaming it, and restarting it worked. No need for terminal commands, no need for rebooting.
Just a quick one. Added a black fill colour with low opacity to the board to give it a little bit of depth and separation from the background.